Welcome to my build log for my Double Cut guitar, there are many different techniques to make a guitar, this is the one I have been practicing. I have been using poplar that i get from home depot in 3/4 " thickness. I make a blank from 4 pieces to get a 1 and a half inch core that i then hollow out. After this it is capped with 1/8" thin lumber.
From here the steps aren't too surprising, routing neck pocket, mounting neck and measuring for bridge. Stringing up and measure / align for pick up poles to sit directly under each string. routing for controls, wiring. Next mounting everything else. Taking it all apart then finishing it. So lets start.
From here the steps aren't too surprising, routing neck pocket, mounting neck and measuring for bridge. Stringing up and measure / align for pick up poles to sit directly under each string. routing for controls, wiring. Next mounting everything else. Taking it all apart then finishing it. So lets start.
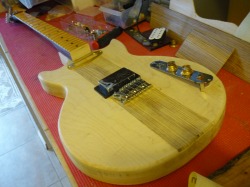
Update 4, Paint and test setup

Could have documented the paint process in a bit more detail, but it was slowing me down, so here are the after paint pictures. Mounted the tuners and bridge to get a feel for the action. Next update will show the custom pickguard creation.


Update 3, More neck mounting, Head stock cutting
So to mount the neck I used a fostner bit to recess and area that i could use to plug and cover the explosed screws. plugged with a walnut dowel. Cut the headstock, then started to prep for painting


Update 2, Neck and Rear control route
I routed the the rear control and made a cover out of Zebrawood. The rear control plated is in the shape of a telecaster control plate.
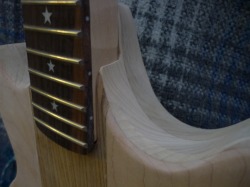
The Eden neck arrived today, with nice star inlays, so I started to work on the neck pocket with my Stew-Mac neck template I routed the neck pocket and shaped the surrounding area. I did a slight contour between the lower horn and the neck pocket.
The Eden neck arrived today, with nice star inlays, so I started to work on the neck pocket with my Stew-Mac neck template I routed the neck pocket and shaped the surrounding area. I did a slight contour between the lower horn and the neck pocket.


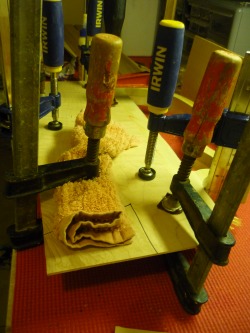
Part 1. Gluing
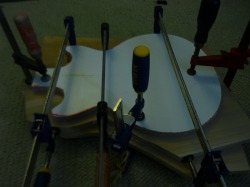
Gluing the 4 poplar boards together, using the template so that the clamps don't leave any indents in the wood.


Routing Hollow chambers into body.
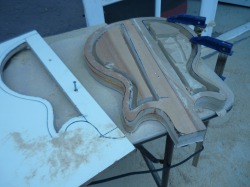
After the boards were glued and dried, i screwed the template to the blank where the wood would be removed for the cavities anyways. One of the chambers didn't turn out as well as the other. Next time I wont clamp the chamber template but screw it down, so that i am not re-clamping and mis-aligning. ALso not having to re-clamp helps concentrate on making clean cuts with the router.


Gluing the caps on
After i had taken what I had to the belt sander and smoothed some of the edges, I glued the 1/8" Maple and Zebrawood pieces for the top cap, and Maple for the bottom cap. Then routed with a round over bit along the edge to cut the cap to the shape of the body, while rounding over the edge at the same time.


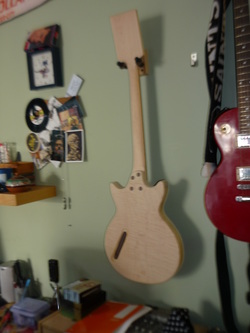
Mocking out the parts
Mocking out the parts for fun, and to kinda get a feel, while I wait for the neck to be delivered.


